
Custom Design, Graphics & File Preparation Guidelines

- Booklets
- Bookmarks
- Brochures
- Calendars
- Catalogs
- Special Shapes
- Tent Cards
- Club Flyers
- Collectors Cards
- Door Hangers
- DVD Packages
- Envelopes
- Staggered Cut Flyers
- Websites
- Flyers
- Hang Tags
- Letterheads
- Mini Menus
- Notepads
- Stickers
- Postcards
- Presentation Folders
- Rackcards
- Rolodex Cards
- Roll Labels
- Table Tents
- Next, provide us with all the relevant information pertaining to your message and concept.
- You may send us the images you’d like us to utilize or we can help you choose stock images.
- We will then conceptualize the design, create the files. For PRINT, we will send you the proof via email for approval. For WEB, we will create a home page mock-up design for your approval.
- After final approval, your print product will be printed and shipped to your satisfaction! Your website will go online live.
.ai, .eps, .indd, .jpg, .pdf, .psd, .qxp, .tif, .zip
- Quark XPress
- InDesign
- Illustrator
- Photoshop
- Document/Layout file(s)
- Fonts (screen and printer)
- Graphics (embedded and nested images)
- .tif photos/scans
- .eps files
- Convert all type in Illustrator to outlines or paths
- Do not specify a rule weight of hairline. Define as .25 point rule
- Clipping paths should be created in Photoshop
- Page/panel sizes should be created in Photoshop
- Save graphic files in .EPS or .TIF format. Not PICT or GIF
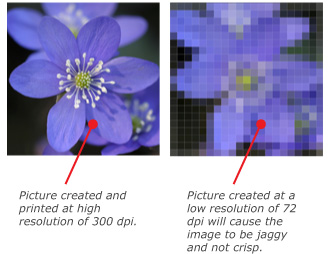
- Place all scans/photos at 100% or smaller (enlargements compromise quality)
- Rotate, scal and crop all images before placing on page
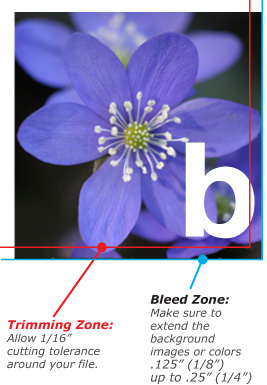
- Include bleed, at least .125” (1/8”) up to .25” (1/4”)
- Proofread all your files. We are not responsible for errors in submitted files.
- Fonts must be embedded in PDF files.
- Fonts must be outlined or converted to paths or curves in EPS files.
- Some fonts have copyright restrictions and will not embed in PDF Files
COLOR MATCHING DISCLAIMER (CMD): (This applies if you see CMYK listed for Product Color or Logo Color)
There are 3 choices when printing CMYK files
1) Provide PMS (Pantone Matching System) colors (usually a PMS number) for us to match to. Having PMS colors is the best choice because when you provide a PMS color number we can convert that number to the CMYK equivalent or closest CMYK equivalent. Be aware, PMS colors are not very helpful for full color images that have gradients or fading colors since each point along the gradient is a different color. If you have no access to PMS colors then we recommend going to step #2 below.
2) Provide a printed sample with correct colors. Since every printer and every monitor show different colors we can't use what we see on our computer screen or printed by our laser printer to check colors as we don't know that what we are seeing is the color you want. If you provide a letterhead, business card, brochure or computer printout that your customer has confirmed the colors are correct and send us this printout we can match to the colors on that printout. This way as the material comes out of the printer we have a physical sample to compare to.
3) Accept whatever color comes out when we print. This is the worst choice but if you cannot provide either of the above options your only choice is to accept whatever colors come out of our machine since we will have nothing to compare to. In the past we have had blues that printed purple or reds that printed pink or other missed colors and we really don't want to have that happen on your job so we urge you to provide either #1 or #2 above so we can make the best product for you.
Many factors can affect the color shown on your monitors or printouts that are completely outside of our control. Likewise, age, environmental and lighting conditions and more can affect the color shown on a printed Certified PMS Color Chart and its interpretation by the human eye.
If no PMS color or sample is provided for the job at hand, as a printer we will be printing your file blind and we take no responsibility for a color that is not to a client's liking. Without Client Stated PMS Colors, we do not have exacting control of color output.
Please note if you cannot provide a PMS color, we can use printed media such as a business card or other printed products that have been previously produced to match to. This process will take more time and will result in matching from 95% to 100% match.
Some colors are not attainable when printing CMYK process, such as some blues, neon colors and metallic colors. RBG and HEX colors (colors on the web and computer monitors) will need to be converted to the closest CMYK equivalent. Not all RGB and HEX colors have CMYK equivalents so final output colors may not be what is expected.
By signing and faxing proof or replying to the Proof as "approved" you're actively approving to produce product under this CMD (Color Matching Disclaimer).